I got a request for Golf Ball cake pops for a baby shower. After a trip to the cake store, I found a mold that I could MacGuyver into working for Golf Balls and set to work. Here is a pic of the completed Golf Ball cake pop. I was really pleased with how they turned out and more importantly so were my clients.
The Party Box Events
Full time working wife and mom of two: a 1 year old and a 2-1/2 year old. I love to plan parties and I've thrown some amazing parties and on some tight budgets. I love to scrapbook and write when I have time.
Monday, June 18, 2012
Saturday, June 9, 2012
Minnie Mouse cake pop Disaster & Redemption
I want to be blogging alot more but like many people my life is crazy busy right now. I have 2 toddlers and work full time and to add to it, we're packing up to move by the First. My mini -goal after we move is to blog once a week. What I'll blog about I'm not quite sure but I'm inventive and will figure it out :)
So back to the disaster, my girlfriend asked me to make Minnie Mouse cake pops for her daughter's birthday party. I told her I could make Minnie Mouse's head silhouette but I knew I couldn't make Minnie's face. She said she knew they would turn out great and that would be fine. (NO Pressure for me!)
I set to work Weds night with an image in my head. I made the cake mix and cooked it in my Pampered Chef cake pan (I think that may have been my first mistake.)I love that pan but I think it kept my cake way too moist. I always seem to have trouble with chocolate cake pops (as opposed to vanilla or any other cake mix flavor for that matter.)
When I went to mash up half of the cake it was just way too soft. I added a little frosting to make the cake "batter" to roll the balls out but the consistency just wasn't right. I don't know how to explain it other than it didn't feel right in my hand. I added basically the other half of the cake and it was still way too moist. But what was I to do? I started rolling the balls out and sticking them on the sticks. They had a bunch of cracks so I tried to salvage them by filling them with chocolate to "glue" it back together. I thought I would use mini-Oreos for the ears. Well, that made them way too top heavy and after dipping the first 3 just for them to fall apart in the melting chocolate, I knew I needed a Plan B. I looked in my pantry and the only thing I had that was "ear shape" was Cheerios. (Mistake #2) I dipped them and they just looked wrong. I also used Milk Chocolate to dip but it was too brown. Here is a picture of the lumpy "silhouette"
(PS- I think these would make cute Bear's. Not lumpy of course!)
So I went to bed after midnight heartbroken. It was a disaster and a failure. I couldn't do anything except tell her I bombed them but that I knew what I could do to fix them. (She was very understanding.)
So Thursday after work I rushed into the cake supply store by my house. (I say rush because they close at 6 and I got there at like 5:50.) I raced around the store and picked up some dark milk chocolate, some medium size confetti disc's and some M & M's. I had to nail the ears that night or there was no way. The super nice man also told me that he had black chocolate. (I didn't notice it in my mad rush) He wished me luck and I raced off to go pick up my babies from Daycare.
We got home, got everyone situated and I started on a new cake. The only cake pan I have is my Pampered Chef one so I decided to cook it 5 mins longer than recommended. I knew it would be moist once I added the frosting anyways. I also noticed that the cake mix I bought said it had 1 cup of pudding in the mix.
Mystery solved! Between my awesome cake pan and the pudding, I think that has to be why my cake was so moist. Fantastic, if you're going to EAT the cake but not so much for Cake Pops. (It's on my To-Do list to buy a chocolate cake mix without the added pudding to see if they still crack. Or maybe it's me and I just suck with chocolate cake. I'll let you know.)
So I took the cake out, put the babies to bed and started the process again. I had a little bit of cake crumb left from the night before on reserve in case I needed it with this one. It helped to cook it slightly longer and have the cake crumb on hand too. I got the "batter" to feel right and set to work.
I used the confetti discs for the ears. (The M & M's worked too but I thought the shape was better using the confetti disc's)
I wanted Minnie's bows to be large so I took a Ziploc bag and cut a tiny hole. I piped about 65 bows in order to get the 24 I needed. They all were about the same size and shape.
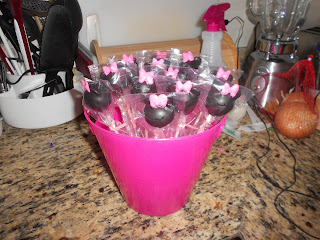
Here is the final result. I'm really glad with how they turned out. It matched the idea I had in my head and she was pleased with them as well.
I wrapped a black bow around the bucket and called it a day!
Friday, April 20, 2012
Safari Serving Trays
My son's Safari birthday party is on Sunday. I've been planning it for a long time. I was at Hobby Lobby and saw these awesome leopard and zebra cloth/wood serving trays but they were $24 each. I kept wandering and found some plain wooden ones for way cheaper. So I decided since, the color scheme is blue, yellow and green I would customize the plain ones to what I wanted. I painted them first, then glossed them with Mod Podge and finally lined them with scrapbook paper. I cut it down to size so it was snug but that I could remove it when I'm done because I'm going to use them on the dessert bar and then I can have 3 trays that I can line again for my next party.
Wednesday, April 4, 2012
Eagle Scout Celebration
Saturday, March 31, 2012
Cake Pops
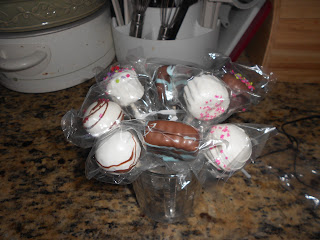
I went to a cake pop class. I had already practiced making truffles and the cake pops are along the same line. I had such a good time. I learned how to pipe on them and sprinkle correctly. BUT my favorite part was marblising them! I made a Zebra one. Now I have to incorporate them into my sons Safari party!!
(My son is turning 1 in April. I knew since he was about 4 months that I was going to throw him a Safari themed first birthday party. )
I'll be using them in the centerpieces. I think I'll make zebra and tiger ones. Can't wait to put it together. :D
(My son is turning 1 in April. I knew since he was about 4 months that I was going to throw him a Safari themed first birthday party. )
I'll be using them in the centerpieces. I think I'll make zebra and tiger ones. Can't wait to put it together. :D
Saturday, March 17, 2012
Oreo Truffles for St. Patty's Day
I wanted to take a stab at Truffles. (I've also heard them called cake or cookie balls) I'm going to a St. Patricks Day dinner tonight so I thought now would be a great opportunity. My sister made them last month for our Oscar's Party and she said they were really simple. And they were soooooo yummy!
Warning: It took alot of starting to blend, stopping to scrap it out and repeat, in order to get it all blended.
I rolled them by hand to try and get them all the same size. For the most part they were except for a few giants.
I used edible stars on the mint ones, I spray painted the milk chocolate ones and I melted some white chocolate chips to make a "drizzle" but I couldn't get them to melt that well and it came out kind of thick.
I sampled one (or 4) for tonight and they're really good! I would definitly make these again. I would say over all they took maybe an hour. 1 package of oreos made just over 3 dozen.
Saturday, March 10, 2012
Flower Pots Part 2
Hello Again,
Sorry it's been busy in my house lately and I didn't have a chance to update on how my flower pot centerpieces turned out.
At first, I was going to wrap the fabric around the pots but when I cut the fabric to size, it didn't have enough pull to it and left the fabric sideways. So next I cut strips of fabric and tried to glue it on the plastic covering but you could see the line of the glue. Next I pulled out Mod Podge and and painted the side of the plastic pot and wrapped the fabric around it. It took two strips of fabric but I got them to line up pretty well. I left the bottom part uncovered so the plants could still be watered. I also tied ribbon around the outside.
At the party, I also added a pinwheel in the plants. Here are some pics of the flower pots and there progess. :) The last 2 pics are from the Eagle Scout event. (Stay tuned for more pics from the event, hopefully in my next blog.)
Subscribe to:
Comments (Atom)


